Do you know how to calculate all of your shop’s business costs?
This is a crucial exercise to run for managing a garment decorating business successfully. Sadly, a lot of shops skip this step.
The goal of this article is to teach you some simple ideas that you can use to handle this task. After all, if you don’t know what your shop costs to operate how can you build an accurate price list that will ensure you turn a profit?
You know what happens when you assume.
One easy method that you can use today is essentially dividing a few core cost centers into “buckets”.
It’s handy to lump like ideas into a group to better understand how they evolve over time. Getting this big picture thinking allows you to better understand your business, and deploy continuous improvement efforts to lower your business costs. Which in turn, makes you more money.
Warning: this blog article is going to ask you to do some homework. If that sounds like too much for you, feel free to skip the article and go back to posting food pics on Facebook.
Yes, those nachos do look tasty.
Double Secret Warning: Homework might contain some math, which is usually a gigantic snooze-fest. I can see your eyes glazing over already, and your index finger is getting twitchy to click on something else.
Please ignore my sarcasm, but before you click away remember that getting better control of your numbers is one of the best industry standards that will allow your shop to scale and “get to the next level”.
Isn’t that your dream?
The Five Buckets
Oh good, you’re still with me.
These cost centers below are a few common standard areas for the decorated apparel industry businesses to review. You can dive deep into each of these with specific effort on individual challenges. Or, just skip the things that might not provide value to you.
Hey, it’s your shop.
Also, I’m not an accountant or even a bookkeeper, so those of you that want to nail me on some accounting practices please remember we’re looking at big picture thinking here.
It’s the 30,000-foot view.
If there are better ideas out there, I’d love to learn about them so feel free to share. This by no means is the only way to do this.
A Historical Perspective
Earlier in my career when I started working the operations side of things, I needed a tool to understand the problems in front of me. The method presented below was a good general way to standardize the numbers to help them make sense.
I’m an artist at heart and use the wrong side of the brain for math, (usually powered by coffee) so I need visuals to understand numbers. There are plenty of people that can scan a grid full of numbers and the answers pop up like gophers in your front lawn. Not me.
Getting the data organized in one place and graphing the information helps me comprehend history and theorize the future.
I’m goofy that way.
This approach may just be the thing that drives the comprehension for your shop’s business journey too.
Here are the four buckets that will help you calculate all of your shop costs, plus a bonus bucket that takes a look at planning for profit:
Overhead
This bucket contains all of the fixed business costs that you spend to run your company. The Overhead Bucket is where you load all of your common recurring expenditures such as your rent or mortgage, phone, website, marketing, insurance, recurring fees or any other business costs that are generally the same from month to month.
If you want to put your salaried labor in this bucket and count that as a fixed cost, then that’s ok. Many folks throw this into their Labor Bucket though.
Whatever you choose, keep it consistent.
Consumables
This bucket contains all of the purchases for the supplies to run your shop. The Consumable Bucket is for ink, emulsion, tape, screens, mesh, chemicals, thread, pellons, needles, pre-treatment fluid, shrink wrap, boxes, labels, paper, markers, band-aids…essentially everything you are using on a regular basis to get orders out the door. Most shops only have a few suppliers, so pulling this data shouldn’t be too difficult.
Please note, that this is not shirts, tote bags, jackets, or any substrate you decorate.
That’s something entirely different. This bucket is only for supplies. Our goal with this exercise is to understand what it costs to decorate the shirt. How or why you mark up your blank inventory is a separate discussion.
Labor
This bucket contains the total of what you pay your staff.
As I mentioned, you could include salaried employees in the Labor Bucket, or just track your hourly staff only. If you do separate the two, be sure to include salaried totals in your Overhead Bucket, as you need to be financially inclusive with the information.
What’s important here is to look at your hourly regular and hourly overtime totals. This is usually the largest variable in running a shop. We will explore some scenarios with labor costs later in the article.
Energy
This bucket contains the total of your shop’s utility bills. The Energy Bucket has the totals from the invoices for electric, natural gas, water, sewer and even propane for your forklifts if you use those.
This is great information to keep, especially if you start a shop sustainability program as many companies work on reducing their energy consumption as one of the first steps as it has the biggest initial payoff.
Profit – The “Extra” Bucket
Here’s the fifth bucket and it isn’t as obvious as the other four.
Most businesses in this industry use a simple formula where they add a decoration fee based on quantity to a marked-up Apparel blank to calculate the final price. The Profit Bucket won’t replace that, but rather supplement the goal for the shop to make money.
That’s why we’re in business, right? Money?
This idea is to just state at the end of the year, what could be a nice profit number that should be reasonably achievable. The key idea here is reasonable.
Sorry, but if you are a one person manual shop jotting down a million dollars might be a fantastic goal, but hardly practical.
For your shop, what is a sensible profit goal? Have you ever said this out loud or written it down? You’d be surprised that few shops have.
Think about what might be a level-headed goal.
The Hard Part
Now comes the hard part of this article, and what I warned you about earlier. Information gathering. Plus, some math. (Danger! Danger!)
Still here? Good.
For each of the five buckets mentioned above, pull all of your resources and get the records for at least five years if you have them. If you haven’t been in business that long, just grab what you have.
We’re looking for monthly totals. We want to concentrate on building an overview of the month to month, year to year journey of your shop.
For the Profit Bucket, that’s about a future goal so don’t worry about that at this point. More on that later.
Many shops have this necessary historical expenditure information in the form of invoices from their vendors, plus the payroll totals in your accounting system. Hopefully, you’ve kept these and somewhat tidy.
If you are an unorganized slob, now is a perfect time to get some folders and start. Yes, for the technology people this can mean folders on your computer, or posts in QuickBooks. Whatever works.
Get this info and sort everything by the month and year for each of the buckets.
This is going to be a lot of work, so budget your time and stay focused. Your job is to grab everything, no matter how small of an expenditure, and organize it by the bucket category for each month and year for your shop’s history.
At the bottom of this article, I’ve placed a link to a simple spreadsheet that you can download to help track your costs for each of these buckets. Spreadsheets are an easy tool to use to help calculate your costs. There is a short section below that explains how to use it.
Do yourself a favor and don’t jump over the rest of this article to click that link yet.
Read everything else first.
Your Work Totals
Next up: gathering the totals for the work you’ve produced for the same time period. Our goal is to “normalize” what you have produced into a unit of work that we are going to call an “impression”.
An impression is essentially each decoration location per shirt on an order. Therefore, printing a shirt with a full front and a full back will equal two impressions. Regardless of the decoration method, we just want the total number of impressions per month and year for your shop. This is the production output for your business.
You can do this two ways. Pick one.
Total Averages
The “apply all” method uses an aggregate total of all work performed regardless of how it was decorated to calculate the numbers. This is the easiest method as you are just looking at the totals produced. My example spreadsheet uses this method.
Multi-Decoration Focused
If you are a multi-decoration method shop and want to drill down your costs for each decoration type, simply segregate your Consumable and Labor buckets for those methods. There may be some overlap, so use your best judgment.
For Overhead and Energy, average out the yearly percentage for each method for the total number of impressions produced for each type and apply that percentage to your cost buckets. That is to say, if you produce 37% embroidery to 63% screenprinting on a yearly average based on the number of impressions, then just apply those numbers to the total money spent for each of those two buckets.
It’s not perfect, but it will work.
Got Your Numbers?
Confused yet? I hope not. But, I’m glad you are still reading. I know the Facebook siren is calling you.
Putting It All Together
For the sake of argument, let’s say you have all of your information gathered. Here’s how we are going to use it. For each month and year, we are going to aggregate the totals for each bucket and divide by the total number of impressions to get the Cost Per Impression.
This is the final magic number you need to know. Both as a shop total and for each individual bucket.
By the way, this number will change constantly with the key driver being efficiency and throughput. The more work you complete in the same time period, the lower your Cost Per Impression will be.
Super efficient shops will have a lower Cost Per Impression than those that aren’t as dialed in.
If you are one of those people that always complain about how bigger shops can do things for less than you charge, understanding your Cost Per Impression can help you drive your strategic thinking to work out those details. Those big shops? They know this stuff cold. That’s one of the ways they grew.
Understanding their numbers is a huge driver to their success.
Example Math
Here’s an example. Let’s say for Shop XYZ, for the energy used in January, they spent:
- 2017 = $532.20
- 2016 = $427.16
- 2015 = $416.27
- 2014 = $372.92
- 2013 = $351.51
Looking back through the records we find the totals for January production impressions:
- 2017 = 23,457
- 2016 = 19,208
- 2015 = 10,653
- 2014 = 9,520
- 2013 = 9,753
Therefore, dividing the number of impressions into the cost for each year’s January data, we can find the Cost Per Impression for the energy used:
- 2017 = $0.02
- 2016 = $0.02
- 2015 = $0.04
- 2014 = $0.04
- 2013 = $0.04
This is exactly how we are going to calculate the Cost Per Impression for the other buckets for every month for each year. From there we can see trends when we graph them. Are our costs going up or down over time? For example, our Energy Bucket graph could look like this:
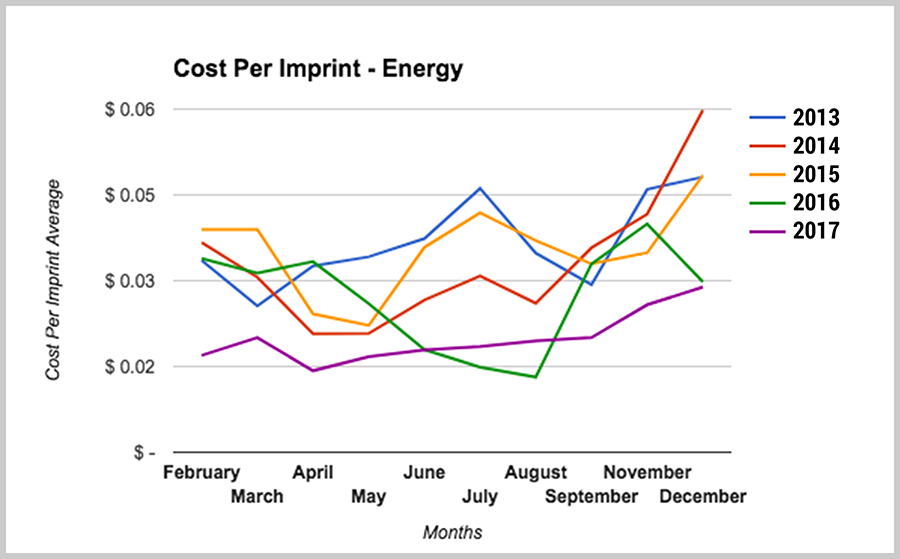
Total Your Costs
If you are part of the leadership of a decorated apparel shop, I believe it is mandatory that you can recite your Cost Per Impression as a current figure at any given moment. Remember, this number will constantly shift. As you make improvements to your business, the goal is to make it a smaller number for each of the four cost buckets.
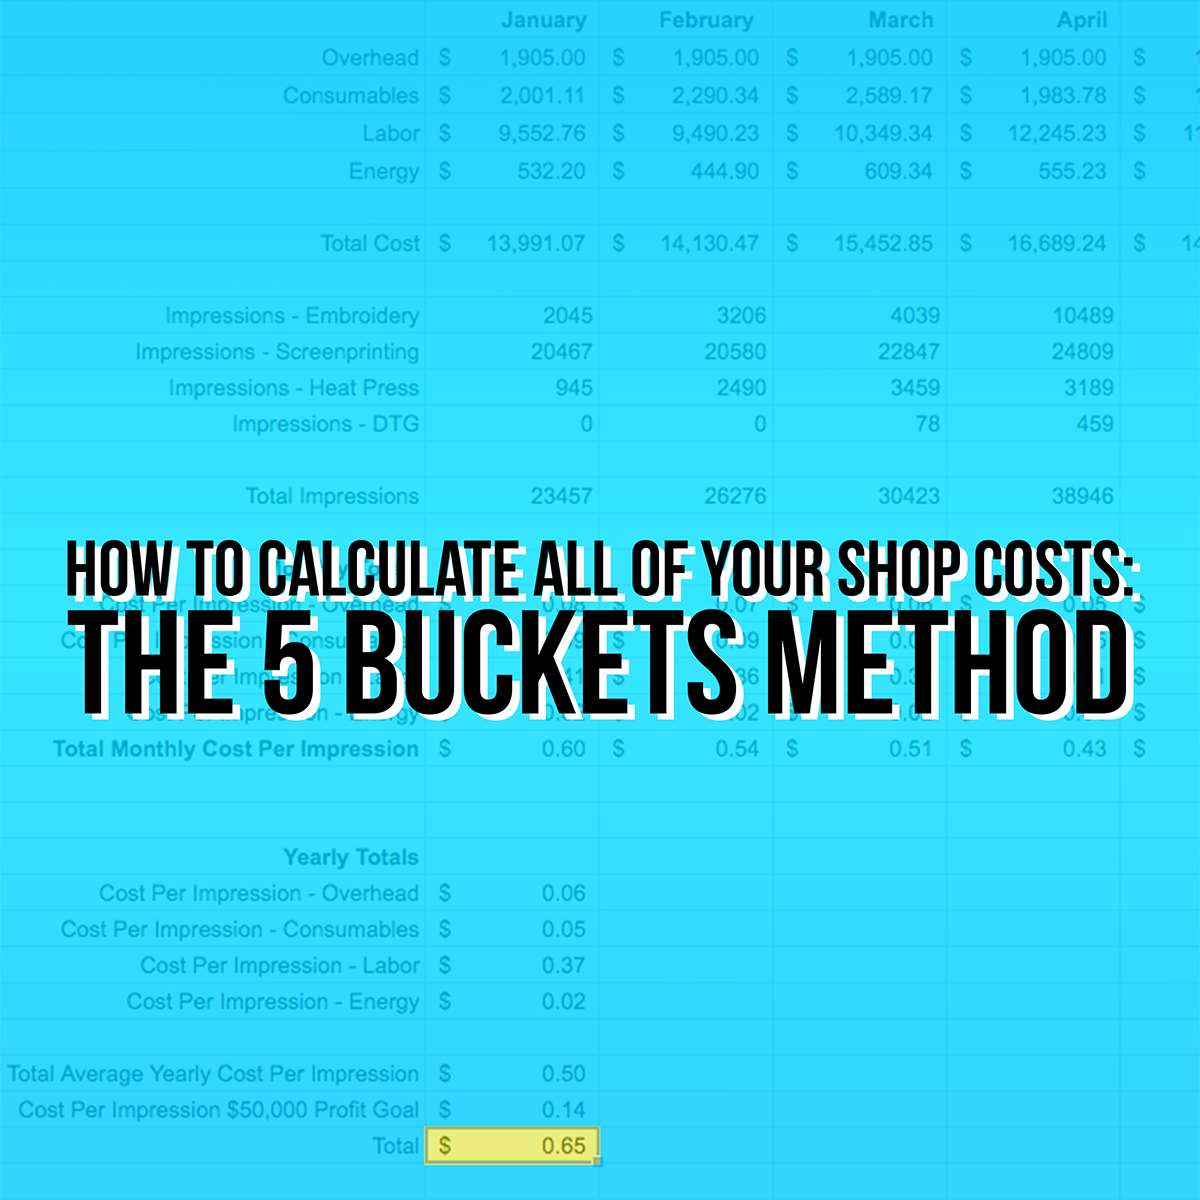
Therefore, let me show you some example numbers for our mythical Shop XYZ. Your shop may have different costs or even more items for each bucket. This is just an example illustration.
Still with me? Good. Don’t go back to posting pics of nachos just yet.
Overhead Bucket – Shop XYZ
January 2017 (Rent $1245 + Phone/Internet $125 + Insurance $200 + Website $250 + Fees $85) = $1905
Total Impressions = 23,457
Overhead Cost Per Impression = $0.08
Consumables Bucket – Shop XYZ
January 2017 (Ink Vendor 1 $326.45 + Ink Vendor 2 $87.99 + Ink Vendor 3 $599.23 + Uline $275.34 + Grainger $123.67 + Home Depot $23.45 + Equipment Parts $440.56 + Online Supplier $124.45) = $2001.11
Total Impressions = 23,457
Consumables Cost Per Impression = $0.09
Labor Bucket – Shop XYZ
January 2017 (Fred $2,712.20 + Suzy $1,410.15 + Mary $1,363.19 + Tom $1,833.34 + Bill $2,233.88) = $9,552.76
Total Impressions = 23,457
Labor Cost Per Impression = $0.41
Energy Bucket – Shop XYZ
January 2017 (Electric $254.86 + Water $128.40 + Sewer $36.30 + Natural Gas $112.64) = $532.20
Total Impressions = 23,457
Energy Cost Per Impression = $0.02
Profit Bucket – Shop XYZ – $50,000 for the year / estimated 345,000 impressions
Remember, this isn’t your markup or replacing your price list…it’s just something to add to your strategic thinking to ensure there’s a pool of money later. Don’t want to do it this way? No problem. Skip it.
Profit Cost Per Impression = $0.14
So, Let’s Calculate All of Your Shop Costs
It’s as easy as adding up each of the buckets. This gives you the average Cost Per Impression with ensuring the company could hit their goal of making $50,000 at end of the year if they produce 345,000 impressions for the year. For shop XYZ, they would use this average cost from the previous year to assist when building their price lists.
(Overhead $0.08 + Consumables $0.09 + Labor $0.41 + Energy $0.02 + Profit $0.14) = $0.74
Is $0.74 surprisingly high for one month as the Cost Per Imprint?
When people add up their real numbers they usually have a minor freak out.
Most decorated apparel industry shops have never calculated these costs using their actual data. Finding your actual Cost Per Impression for each month year over year can help you understand not only your history but the direction you need to take for future profitability.
I’ve talked to shop owners before who thought their Cost Per Impression was about $0.25. They never did the math and didn’t include all of their costs. They were stumped as to why they had great sales, but at the end of the year didn’t have much to show for it.
Does this sound familiar?
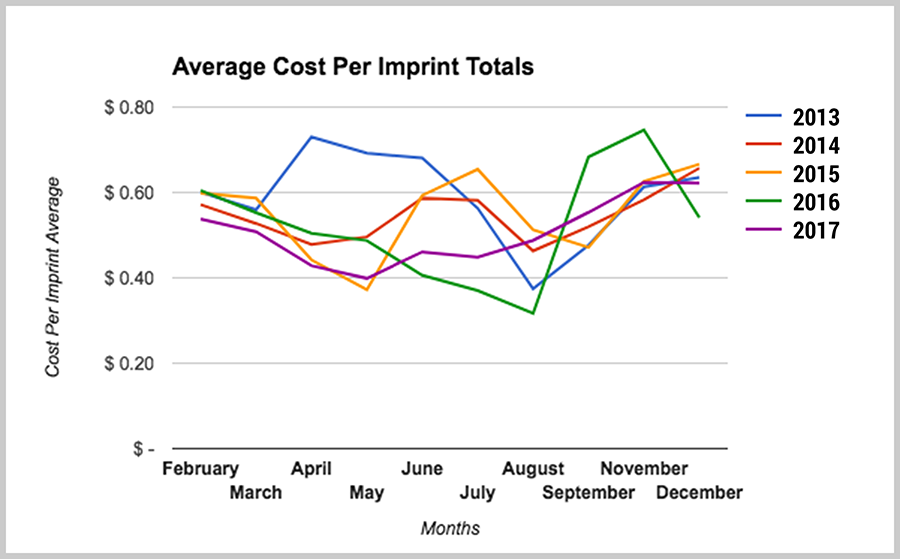
Remember, these are general averages. When you buy that bucket of ink for that job next month, it could show up on the consumable total for the month prior. It’s ok. It all works out in the end. Some months will have better numbers than others.
Here’s how Shop XYZ Cost Per Impression data could look over a five year period.
What’s Next?
After you’ve calculated your average Cost Per Impression, what’s the next step?
Basically two things.
First Step
You need to look at your pricing schedule and see if it still makes sense. Would you be making money if your average Cost Per Impression for January is $0.74? This could mean you need to rethink your pricing strategy.
- When you don’t produce a lot of work your Cost Per Impression can skyrocket. Make sure you are thinking ahead if you see a slow down coming. Don’t wait to make critical decisions.
- Maybe it means across the board adjustments to your pricing matrix with a percentage increase.
- Another idea could be to rethink how you are calculating upcharge items such as polyester ink, printing on fleece or hoodies, or art fees. Would a change to these make a difference for certain scenarios?
- What dollar amount are you using when calculating screens? $10? $15? $20? How big of a difference could this make, based on how many screens you use a year? Have you measured what it costs you to build, coat, expose, wash and reclaim a screen?
- Inventory charges for freight in, non-compensated art time, special handling like sorting, or even the cost of packaging can add up over time. Are you including all of the factors in your pricing?
- This might also mean you need to examine each decoration method more carefully to see what those total costs might be. The 5 Bucket Method is a starting point in the discussion.
Obtaining the Cost Per Impression for each of the cost buckets will allow you to take a closer examination of problems.
Does something stick out to you? If you change something does that result in a cost reduction?
Second Step
Starting to dig into this work will allow you to build better margins. Your margin is the difference between what you charge and what it costs you to produce the item. That chunk between the two is your profit.
Every tiny tweak you make to enlarge that profit chunk makes a difference. Dividing your core costs into buckets allows you to measure these separate ideas to firmly grasp what happens when you start making changes.
Another thought here would be to examine your customer base. Could you do something different that would allow you to make more money?
Any work you to do that increases your efficiency may pay big dividends to the overall Cost Per Impression. Higher throughput within an equal time period decreases cost.
Let’s take a closer look at what might happen.
Example Scenario 1
I picked January as my example month for a reason.
Typically, this is a month where shop production is at the lowest. However, expenditures are higher due to increased energy costs for the winter months, prep for the upcoming spring busy season, and usually keeping staff around even though the work is slower.
For this scenario, what if the shop reduced the hourly labor by 10 hours per week for two people, Suzy and Mary?
Nothing else changes. Would that make a difference? Let’s run the math.
Here’s our new Cost Per Impression for each bucket:
- Overhead (Old $0.08) = New $0.08
- Consumables (Old $0.09) = New $0.09
- Labor (Old $0.41) = New $0.38
- Energy (Old $0.02) = New $0.02
- Profit – this stays the same = $0.14
Assuming the shop had the same output with the reduced labor, this would reduce their Cost Per Imprint by $0.03 and save the company $703.71 for January. While not a big amount, this can add up over time.
Example Scenario 2
A better idea to reduce your shop’s costs is to make tasks more efficient. Equipment can do this for you, but sometimes just an extra set of hands may help as well.
For Shop XYZ, adding help to decrease set up and take down times on press was their idea to help with efficiency. Instead of the scenario being based on the premise that the workload is slower, what if the challenge was getting booked production completed in a timely fashion?
Frank is hired at $9 an hour to help get jobs organized, add ink to screens for longer runs so presses don’t stop, decrease setup times, and decrease downtimes between jobs by helping with press turnover. The goal is to drop the average setup time for screens from 9 minutes per screen to 5 minutes or less.
Frank works 40 hours per week, so that’s an extra $1440 per month added to Shop XYZ’s payroll. If we use January’s total and add Frank’s labor for the example that would be a total of $10,992.76 for the shop.
Dropping their setup times to five minutes per screen, and the added help at press allows the shop to print an average of an extra 4 jobs and 600 impressions per day. That’s an extra 12,000 impressions per month added to the total, which is a dramatic increase.
Here’s our new Cost Per Impression for each bucket:
- Overhead (Old $0.08) = New $0.05
- Consumables (Old $0.09) = New $0.06
- Labor (Old $0.41) = New $0.31
- Energy (Old $0.02) = New $0.02
- Profit – this stays the same = $0.14
When you know your costs, you can play the “what if” game to help you determine what to do.
Shop XYZ original example cost per imprint was $0.74. By adding some unskilled labor to help push more jobs out the door, the cost per imprint dropped to $0.58. That’s an extra $0.16 for each impression produced because more work was shipped during the same amount of time.
Of course, Frank would need training and the production numbers would need to be monitored to ensure that the cost reduction goals were met.
It might be counter-intuitive to you to add to your labor cost to increase your efficiency, but using models like this you can see what type of affect any changes you make might have.
You then can set some goals associated with the change, and work on completing those with your staff.
Spreadsheet For You to Calculate All Of Your Shop Costs
Click Here to download the spreadsheet. This is an example, with made up numbers.
To use for your shop, simply enter your totals in each field. As it’s an active spreadsheet, all of the formulas are already working. If you don’t have totals for any field, simply delete the number in the cell so it doesn’t calculate the totals.
As you can see, I entered data for the rest of 2017 to simulate Shop XYZ growth. You can do the same with your shop to estimate where you might be heading by the end of the year.
If you haven’t worked on this type of idea before that’s ok. Plenty of shops that I talk to on a regular basis has not started on this work either. You aren’t alone by any means.
The key is to start.
Ok, now I’m ready to eat some nachos!
.
“Start where you are. Do what you can. Use what you have.” – Arthur Ashe
“An investment in knowledge pays the best interest.” – Benjamin Franklin
“A person who has never made a mistake never tried anything new.” – Albert Einstein
