How are you solving the production sample riddle?
One common problem that many decorated apparel shops face is how to produce, catalog and use samples for program or repeat orders. Many shops struggle with storing and organizing hundreds of decorated shirt samples.
Do you do this?
Actually, there are all sorts of scenarios:
- Your client wants you to knock out a sample for approval before running hundreds or even thousands of shirts.
- Repeat program orders need a sample to match for production.
- The decoration process is technical, and you need to physically proof the order before running the job.
- Maybe your customer “just needs to see it”.
Over time these samples build up and can crowd the floor of even the best of shops. Without the right person in charge, organizational skills, or specific procedures, the sample area it ends up looking like a teenager’s dirty laundry pile.
Of course, nobody wants that.
So what are some best practices that you can employ to help alleviate the stress of retrieving samples easily when you need them? I reached out to some industry friends, Dan Campbell and Nathan Leber, on how they have organized this work in the past. Dan with DotToneDesigns worked for Disney for a number of years, and Nathan handles a lot of work for Abercrombie, Express, and Pink, and has his own shop at Leber Design and Print. These brands have considerable sampling needs, and they have pointed out some great tips. Thanks, guys!
I’ve combined their ideas and thrown in my own two cents to give you a list of best practice steps that you can use to make your sampling process better. Here goes:
Good Communication – Ready, Aim, Fire
First, have good communication with your customer. Explain the expectations for the order and how their choices could impact production.
- How will the shirt color affect the decoration? Could the fabric content come into play?
- What changes will there be when printing on both light and dark shirts?
- Maybe they want a soft hand print. Do you have to use water based ink, or can you just use curable reducer with regular plastisol? What about a higher mesh selection?
- Can you digitally print over a hoodie zipper seam?
- What happens when you discharge a triblend t-shirt?
- Do you really have to print on the inside of a t-shirt to have a vintage look on the outside? Can you engineer the print instead?
- Can you really sew 1/8″ high type on a Carhartt work jacket?
- What steps are necessary to print over sublimated camouflage patterned shirts?
- Maybe some simple stuff too, like how many inches down from the collar will the image start? You may even need to explain how the Pantone Matching System works. Don’t assume.
Some customers have many years in this industry, while others are brand spanking new. Be sure everyone is on the same page before you start working. It’s important to establish a robust level of communication regarding the expectations on the order before anything starts. Ask questions. Discuss options. Be realistic.
This happens at the sales and order entry level. Once that’s firmly in place, the rest your staff can better understand what to do with their part of the job. Before you start production, try to engineer the problems out of the order.
If you are just an order taker and shove anything into the system willy-nilly, there’s going to be a greater chance for havoc in production.
Work smart.
Production Timing
Make sure you discuss sample production timing.
If a sample is necessary before the final production run can begin, this needs to be part of the production timeline. You should be able to understand and predict what can happen for production scheduling today, tomorrow, or even next week. When would you need to drop a sample order onto your production schedule? Working backward from that day and time, what has to happen on each step in every department in your shop and with the client? Will you need to overnight the sample shirt in order to have enough time to produce the order by the ship date? Who is paying for that?
Have a discussion about scheduling and include this in your quoting process and order information packet. As a shop, don’t assume you’ll have time to knock out a sample. Work backward from your customer’s ship date. Will you have enough time? Get those expectations out in front of your customer early.
A good number of times that sample has to go through a daisy chain of approval steps somewhere and it may not be instantaneous. What happens then?
You don’t want to be holding the short end of that stick and have to produce the order with zero time left for production. Then that’s you eating the overtime if you never discussed it with your customer. Bring it up.
Sample Work Orders
Sample orders should be their own jobs. Period.
Don’t just pull a few shirts out of the main order and run a sample freestyle. A better process is to make the sample its own order, with the main job an entirely different order. Yes, that might mean your order entry folks have to create two orders. (I can hear them complaining now.)
The benefits of earmarking a Sample Order and a Production Order far outweigh the few minutes it might take for someone to create those orders in the system. When the sample order is segregated, it allows you to add notes specific to that sample run.
Need to run another sample because something else had to be tweaked? Make it another order too.
Doing it this way properly accounts for inventory used, who said what in the notes section, and even the shipping or billing information properly detailed. It’s also easier on your production scheduler, as you are creating proper events that impact the timing on your production floor.
Maybe during the production sampling, the art changes. Showing that Sample 1 is different than Sample 2 in your system could be a huge win for you a few months down the road when you are reviewing something with your customer.
Why not make things easier?
Digital Proofs
Proof everything digitally, including customer-supplied art. Sometimes this is the best way to catch mistakes that are designed by someone else.
Why? For starters, a digital proof is easier to produce and send than a physical one, so always show the image mocked up on a shirt (or at least the shirt color as a background). This will ferret out all the challenges with how the shirt color may affect the final production.
For example, does the client really want black text on a navy shirt? When you show the customer how it will look, you’ll save yourself a lot of headaches later. This is when they realize that they didn’t think through their idea fully. Digital proofs are a fantastic first step in the approval process because they don’t affect your main production floor scheduling.
I’ve heard nightmare stories from printers over the years that didn’t use a digital proof and just assumed the art was correct because it came from the customer. It pays to make sure.
Eyeballs on the Samples
Print the samples according to the instructions given and the proof that the customer approved.
Before you send the sample to your customer, though, have at least one person (preferably two) review the print and make sure it completely matches up with the digital art. Review for spelling, PMS color matches, quality of the print, and any defects with the shirt. Whoever is doing the proofing must sign the Work Order. This indicates that it was perfect. Make it a big deal, and train your staff on what this means. Have several people capable of doing this important task, so you aren’t in a jam when Fred is off on that day and he’s the only one that has the ability to approve.
Getting samples out the door sometimes is a rush event, but it always pays to slow down and make sure they are as perfect as you can get them. I like using the “finger rule”. This means you compare the approved digital proof to the printed sample. Point to one thing on the proof with your finger, then find it the same way on the shirt. Just go back and forth until everything is reviewed. Thoroughly inspect the entire shirt, whether you decorated all sides or not. Hold it up. Is the decoration straight? Exactly positioned like the mock up? Do the PMS colors match perfectly? Is there anything at all that you don’t like?
If anything is wrong, fix it. Don’t send anything that isn’t perfect.
When you send your sample to your customer, they are going to use it as the benchmark for your shop for the entire order. This means that if you send them a great looking print, but it’s a few degrees crooked on the shirt or off center, they will think the entire order will be produced that way. You’ll spend the next few days over-explaining how the real job will be perfect. The customer won’t believe you either, as they are thinking “they couldn’t even print one shirt correctly.”
Avoid this nightmare and establish strict standards on how samples are approved and sent.
Sample orders live in the No-Shortcut Zone.
Keep Your Own Sample
Make one for your shop. This sometimes is the most crucial step.
If you don’t have something to match, how can you replicate what was sent to the customer? Many shops don’t think of this until it’s too late. Then they are forced to just cross their fingers and pray they can remember how the original sample was produced.
Don’t get into this jam. Plan for this at order entry. Your sample should also be perfect, and match what the customer will be viewing. During production, your crews should be regularly comparing current production to this sample to make sure every shirt matches.
This won’t happen by accident, and if your orders come with a customer supplied inventory challenge, make sure that they provide you with shirts for you to keep on hand. Discuss why this is important to them early. If they won’t order one for you, think about ordering one for you anyway.
Think of it as an insurance policy. You’ve got one of those for your building, your car, your life…why not an important order too?
Be OK with Change
Make any changes as necessary. Your client might want something tweaked, and that’s okay. That’s why you are sampling in the first place. I’ve seen printers get extremely agitated to have to print something again, but in reality, it is just part of this business.
Keep going until it’s approved. Make sure you are keeping careful records of how you are producing the sample. This is the recipe that you will need to follow a few weeks or months from now when you need to reprint the job. Furthermore, don’t foolishly rely on your printer, heat press operator, or embroidery machine operator to “remember what they did because they ran the job”.
Get that formula written into your production notes so anyone can run the order. Remember your production success can’t be tied to your employees. Instead, it has to be linked to the standards you’ve created and how you are communicating them.
Finally, nobody should hold the secrets.
Write the Recipe Down
What are the ingredients for the success recipe? This includes basics such as screen mesh count and tension. Squeegee durometer, angle, and pressure. Pantone colors, of course, but also the percentage by weight of curable reducer or ZFS for discharge. Don’t forget flash dwell times or other pertinent bits of information that could affect the print. Remember, the same set-up can print differently on different shirt colors or styles. Accordingly, you may have different formulas for each.
For embroidery, jot down thread color used, bobbin tension and speed. What backing did you use? One layer or two? Anything special that was done to hoop it straight or line up the job?
Ideally, you are using a standardized form you have set up in your shop. Every field is mandatory. Think it through. Six months from now what information would you need to be able to set it up again to exactly match the sample shirt?
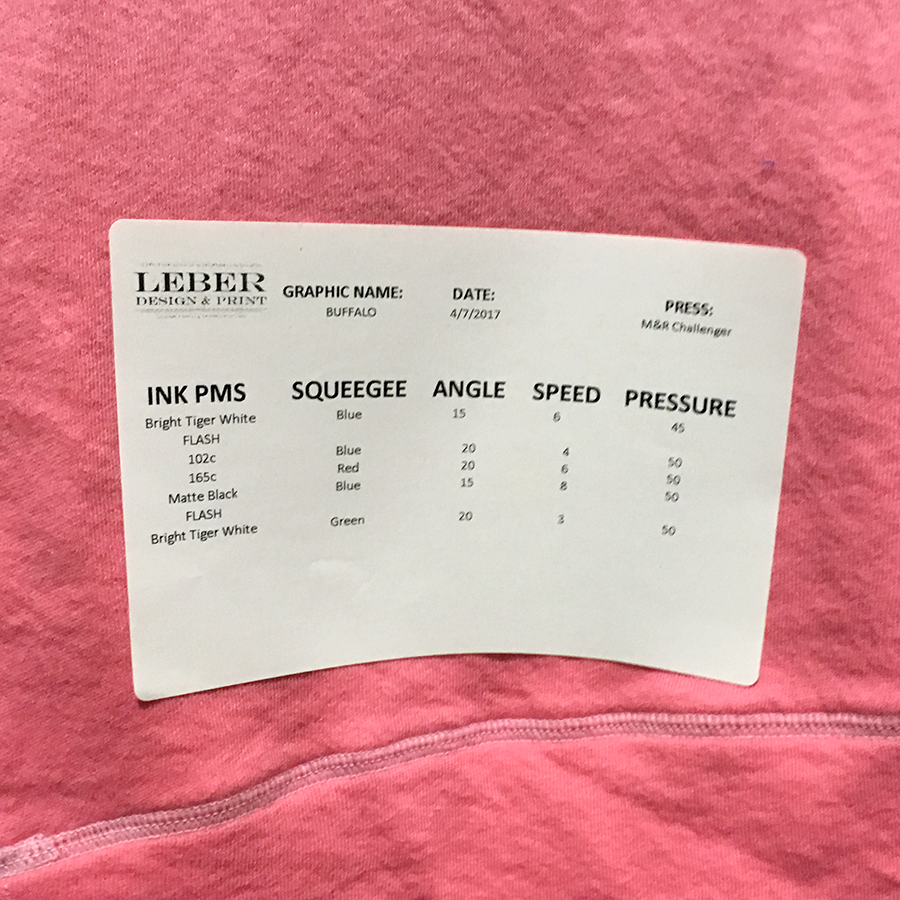
One great trick is to print the data on a 4″x6″ label and stick it to the garment sample.
First and foremost, details count.
Storing Your Sample
Once you have the sample approved, trim the shirt down to the image size and discard the rest. Staple it to a piece of cardboard. Multiple locations may get multiple cardboard assemblies, as you might use one of the locations for something different in the future.
The cardboard sample unit goes into a big envelope that is identified with the design title, art number, client’s name, salesperson, date ran and other information that you feel needs to be on the outside of the folder. A copy of the print sample set-up recipe is included inside and also stapled to the outside of the envelope. Print a color mock up of the sample that’s inside and affix that to the outside of the envelope next to the recipe as well.
If you noticed, the above paragraph has one copy of the instructions going inside the envelope and one affixed to the envelope itself. That’s because sometimes things get separated, lost, mangled, or the shop dog ate it. Have two copies ensures that you can piece together what you are supposed to do.
These envelopes are stored in a designated area and are organized by the art design number or any way that you deem easy to use. Organize and keep these orderly so they can be retrieved quickly. Make sure you have a procedure for putting the envelopes back. I would suggest having someone manage the area, and that’s part of their main function. Create a “Sample Manager” role.
Furthermore, if you don’t want to use the cardboard in the envelope trick, at least use the Sample Data Sticker as shown above. Too complicated to print a sticker? Write the info on some masking tape and adhere to the garment.
Are you are using a computer system for your shop? Be sure also that the final recipe is noted in the notes for both the sample and the final production work orders. Your Sample Manager can be the one to double check that everything matches up with the physical sample kept, and the information in your system.
Herding the Cats
If your shop’s sample process is an unorganized mess, getting everything lined up this way is going to be like herding cats. It’s not fun, and it’s going to take constant effort to get control. This means lots of communication, training, and accountability for your team. There is going to be resistance. Confusion. Maybe even some mistakes.
I read somewhere recently that for most people, it takes hearing something seven times before it sinks in. If you are changing a process, that’s a lot of repetition. Don’t think you can just change your sample process, post a sign you made in Word, and walk away. Problem solved! That’s not reality though.
Discuss with your team how it should work. Get input. Set the standards for samples. Train your crew. Tweak what doesn’t work. Hold people accountable.
Samples don’t have to be that unorganized mess in the corner.
Take charge!
.
“Progress is man’s ability to complicate simplicity.” – Thor Heyerdahl
“I love deadlines. I like the whooshing sound they make as they fly by.” – Scott Adams
“Design is a funny word. Some people think design means how it looks. But of course, if you dig deeper, it’s really how it works.” – Steve Jobs
